전체 글 (306)
2022-01-21 05:29:45
반응형

Implement Queue using Stacks


 문제 설명


Implement a first in first out (FIFO) queue using only two stacks. The implemented queue should support all the functions of a normal queue (push, peek, pop, and empty).

Implement the MyQueue class:

  • void push(int x) Pushes element x to the back of the queue.
  • int pop() Removes the element from the front of the queue and returns it.
  • int peek() Returns the element at the front of the queue.
  • boolean empty() Returns true if the queue is empty, false otherwise.

Notes:

  • You must use only standard operations of a stack, which means only push to top, peek/pop from top, size, and is empty operations are valid.
  • Depending on your language, the stack may not be supported natively. You may simulate a stack using a list or deque (double-ended queue) as long as you use only a stack's standard operations.


 제한 사항


  • 1 <= x <= 9
  • At most 100 calls will be made to push, pop, peek, and empty.
  • All the calls to pop and peek are valid.


 입출력 예


Example 1:

Input
["MyQueue", "push", "push", "peek", "pop", "empty"]
[[], [1], [2], [], [], []]
Output
[null, null, null, 1, 1, false]

Explanation
MyQueue myQueue = new MyQueue();
myQueue.push(1); // queue is: [1]
myQueue.push(2); // queue is: [1, 2] (leftmost is front of the queue)
myQueue.peek(); // return 1
myQueue.pop(); // return 1, queue is [2]
myQueue.empty(); // return false


 Python 코드


Python code 

class MyQueue: 
	def __init__(self): 
		// 문제에서 2개의 스택을 사용하라고 하니, 배열을 2개를 사용
		self.stack1 = [] 
		self.stack2 = [] 
		
	def push(self, x: int): 
		// stack1에는 push 데이터를 넣어줌
		self.stack1.append(x) 
		
	def pop(self): 
	// pop을 할때에는 stack1의 배열을 거꾸로 변경하는 과정이 필요
	// pop을 할때, stack1.pop()을 하여, stack2에 넣어줌
	// stack1 [1, 2, 3] -> stack2 = [3, 2, 1] 
		self.peek() 
		return self.stack2.pop() 
		
	def peek(self): 
		// peek는 큐의 첫번째 값을 가져와야 하므로 
		// stack1의 모든 값을 거꾸로 stack2에 넣어서, stack2[-1]을 리턴
		
		if not self.stack2: 
		// stack1의 모든 값이 나올때까지 해주는데, 
		// stack2가 비어있지 않은 경우에 stack2에 값을 넣을 경우 
		// pop()이 힘들어지니 stack1을 그대로 이용
		
		// 1) stack1 [1, 2, 3] -> stack2 [3, 2, 1] 
		// 2) MyQueue.push(4) 
		// 3) stack1 -> [4] , stack2 [3, 2, 1] 의 경우 
		// stack1의 값을 넣어주면 stack2는, [3, 2, 1, 4]가 되므로 pop을 하기가 힘듬 
		// 4) stack1의 [4]는 어차피 stack2가 다 빌때까지 필요없으므로 
		// 그냥 stack2가 빌때까지 stack1에 넣어둠 
		
			while self.stack1: 
				self.stack2.append(self.stack1.pop()) 
		return self.stack2[-1] 
		
		
	def empty(self): 
		return (len(self.stack1) == 0) and (len(self.stack2) == 0)

* 참고 링크 : https://jasmine46.tistory.com/71


 C++ 코드


C ++ code

// Time:  O(1), amortized
// Space: O(n)

class Queue {
public:
    // Push element x to the back of queue.
    void push(int x) {
        A_.emplace(x);
    }

    // Removes the element from in front of queue.
    void pop(void) {
        peek();
        B_.pop();
    }

    // Get the front element.
    int peek(void) {
        if (B_.empty()) {
          // Transfers the elements in A_ to B_.
          while (!A_.empty()) {
            B_.emplace(A_.top());
            A_.pop();
          }
        }
        if (B_.empty()) {  // B_ is still empty!
          throw length_error("empty queue");
        }
        return B_.top();
    }

    // Return whether the queue is empty.
    bool empty(void) {
        return A_.empty() && B_.empty();
    }

 private:
  stack<int> A_, B_;
};

* 참고 링크 : https://shareablecode.com/snippets/implement-queue-using-stacks-c-solution-leetcode-FaBa-R43B


 출처


https://leetcode.com/problems/implement-queue-using-stacks/

반응형
2022-01-21 04:42:22
반응형

Implement Stack using Queues


 문제 설명


Implement a last-in-first-out (LIFO) stack using only two queues. The implemented stack should support all the functions of a normal stack (push, top, pop, and empty).

Implement the MyStack class:

  • void push(int x) Pushes element x to the top of the stack.
  • int pop() Removes the element on the top of the stack and returns it.
  • int top() Returns the element on the top of the stack.
  • boolean empty() Returns true if the stack is empty, false otherwise.

Notes:

  • You must use only standard operations of a queue, which means that only push to back, peek/pop from front, size and is empty operations are valid.
  • Depending on your language, the queue may not be supported natively. You may simulate a queue using a list or deque (double-ended queue) as long as you use only a queue's standard operations.


 제한 사항


  • 1 <= x <= 9
  • At most 100 calls will be made to push, pop, top, and empty.
  • All the calls to pop and top are valid.


 입출력 예


Example 1:

Input
["MyStack", "push", "push", "top", "pop", "empty"]
[[], [1], [2], [], [], []]
Output
[null, null, null, 2, 2, false]

Explanation
MyStack myStack = new MyStack();
myStack.push(1);
myStack.push(2);
myStack.top(); // return 2
myStack.pop(); // return 2
myStack.empty(); // return False

 Python 코드


Python code 

class MyStack:

    def __init__(self):
        self.q = deque()

    def push(self, x: int) -> None:
        self.q.append(x)

    def pop(self) -> int:
        for i in range(len(self.q) - 1):
            self.push(self.q.popleft())
        return self.q.popleft()

    def top(self) -> int:
        return self.q[-1]

    def empty(self) -> bool:
        return len(self.q) == 0

# Your MyStack object will be instantiated and called as such:
# obj = MyStack()
# obj.push(x)
# param_2 = obj.pop()
# param_3 = obj.top()
# param_4 = obj.empty()

* 참고 링크 : https://www.youtube.com/watch?v=rW4vm0-DLYc 


 C++ 코드


C ++ code

class MyStack {
    queue<int>q;
public:
    /** Initialize your data structure here. */
    MyStack() {
        
    }
    
    /** Push element x onto stack. */
    void push(int x) 
    {
        q.push(x);
        for (int i=0; i<q.size()-1; i++)
        {
            q.push(q.front());
            q.pop();
        }        
    }
    
    /** Removes the element on top of the stack and returns that element. */
    int pop() 
    {
        int result=q.front();
        q.pop();
        return result;
    }
    
    /** Get the top element. */
    int top() 
    {
        return q.front();
    }
    
    /** Returns whether the stack is empty. */
    bool empty() 
    {
        return q.empty();
    }
};

/**
 * Your MyStack object will be instantiated and called as such:
 * MyStack obj = new MyStack();
 * obj.push(x);
 * int param_2 = obj.pop();
 * int param_3 = obj.top();
 * bool param_4 = obj.empty();
 */

* 참고 링크 : https://github.com/wisdompeak/LeetCode/blob/master/Stack/225.Implement-Stack-using-Queues/225.Implement%20Stack%20using%20Queues.cpp


 출처


https://leetcode.com/problems/implement-stack-using-queues/submissions/

반응형
2022-01-21 03:49:07
반응형

Evaluate Reverse Polish Notation


 문제 설명


Evaluate the value of an arithmetic expression in Reverse Polish Notation.

Valid operators are +, -, *, and /. Each operand may be an integer or another expression.

Note that division between two integers should truncate toward zero.

It is guaranteed that the given RPN expression is always valid. That means the expression would always evaluate to a result, and there will not be any division by zero operation.

* 역폴란드 표기법 : https://ko.wikipedia.org/wiki/역폴란드_표기법

 제한 사항


  • 1 <= tokens.length <= 104
  • tokens[i] is either an operator: "+", "-", "*", or "/", or an integer in the range [-200, 200].


 입출력 예


Example 1:

Input: tokens = ["2","1","+","3","*"]
Output: 9
Explanation: ((2 + 1) * 3) = 9

Example 2:

Input: tokens = ["4","13","5","/","+"]
Output: 6
Explanation: (4 + (13 / 5)) = 6


Example 3:

Input: tokens = ["10","6","9","3","+","-11","*","/","*","17","+","5","+"]
Output: 22
Explanation: ((10 * (6 / ((9 + 3) * -11))) + 17) + 5
= ((10 * (6 / (12 * -11))) + 17) + 5
= ((10 * (6 / -132)) + 17) + 5
= ((10 * 0) + 17) + 5
= (0 + 17) + 5
= 17 + 5
= 22


 Python 코드


Python code 

class Solution:
    def evalRPN(self, tokens: List[str]) -> int:
        stack = []
        for t in tokens:
            if t not in {"+", "-", "*", "/"}:
                stack.append(int(t))
            else:
                b, a = stack.pop(), stack.pop()
                if t == "+": stack.append(a + b)
                elif t == "-": stack.append(a - b)
                elif t == "*": stack.append(a * b)
                else: stack.append(trunc(a / b))
        return stack[0]

* 참고 링크 : https://dev.to/seanpgallivan/solution-evaluate-reverse-polish-notation-192l

* 설명 참고 링크 : https://www.youtube.com/watch?v=P8xYysvjLd0 


 C++ 코드


C ++ code

int evalRPN(vector<string>& tokens)
{
    stack<int>st;
    for(auto it : tokens)
    {
        if(it=="+" || it=="-" || it=="*" || it=="/"  )
        {
            int f = st.top();st.pop();
            int s = st.top();st.pop();

            if (it == "+")
              { int r = s + f;  st.push(r); }
            else if (it == "*")
              { int r = s * f;  st.push(r); }
            else if (it == "-")
              { int r = s - f;   st.push(r); }
            else if (it == "/")
              { int r = s / f;   st.push(r); }
        }
        else{ st.push( stoi(it)); }
    }
    return st.top();
}

* 참고 링크 : https://leetcode.com/problems/evaluate-reverse-polish-notation/discuss/1234191/c-easy-optimized-solution-150-evaluate-reverse-polish-notation


 출처


https://leetcode.com/problems/evaluate-reverse-polish-notation/

반응형
2022-01-20 17:54:31
반응형

IAM이란?

IAM(Identity and Access Management)은 AWS 리소스에 대한 액세스를 안전하게 제어할 수 있는 웹 서비스입니다. IAM을 사용하여 리소스를 사용하도록 인증(로그인) 및 권한 부여(권한 있음)된 대상을 제어합니다.


 출처


https://docs.aws.amazon.com/ko_kr/IAM/latest/UserGuide/introduction.html


반응형
2022-01-20 16:39:07
반응형

1. udemy 홈페이지 접속

https://www.udemy.com/

2. 수강을 원하는 강의 들어가기


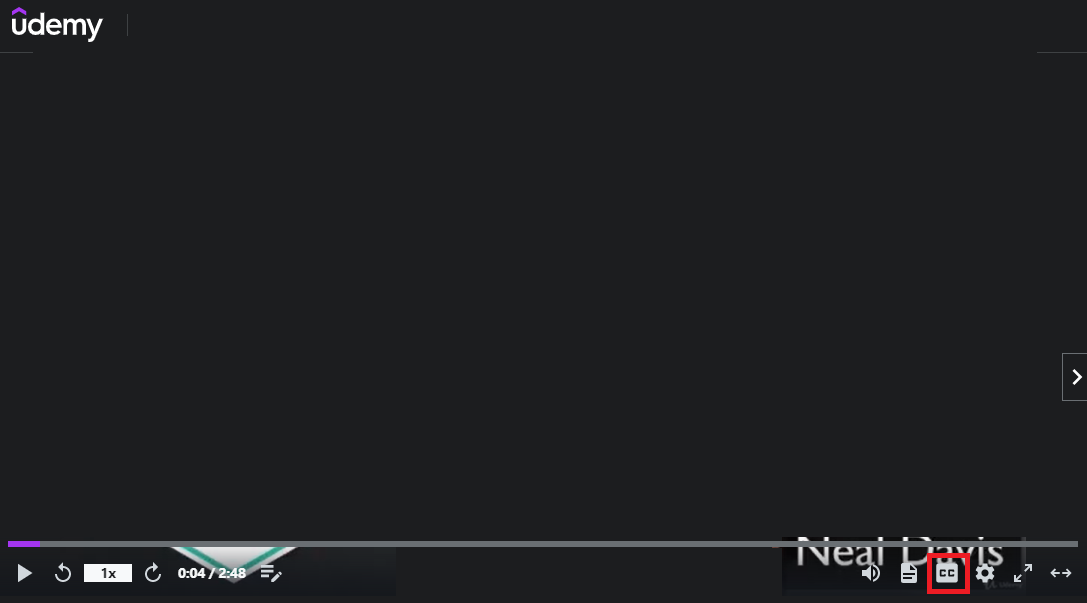
3. 우측 하단에 CC라고 되어있는 아이콘 마우스로 클릭

4. CC - 자막설정 [Caption settings] 마우스로 클릭


5. 자막설정 [Caption settings] - 동영상 아래 표시 [Display under video] 체크

6. 동영상 강의 아래 자막 확인


7. CC 옆에 문서모양 클릭하여 동영상 강의 전체 자막(Transcript) 확인

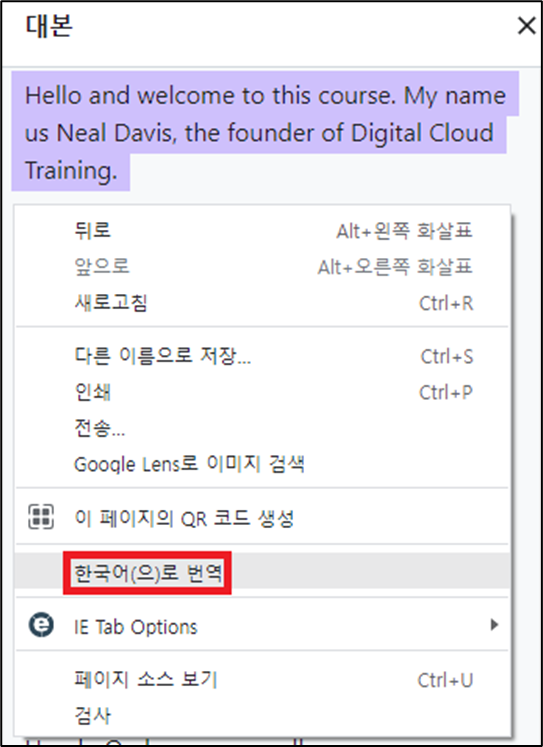
8. 동영상 강의 전체 자막(Transcript)에서 마우스 우클릭하여 한국어로 번역 선택

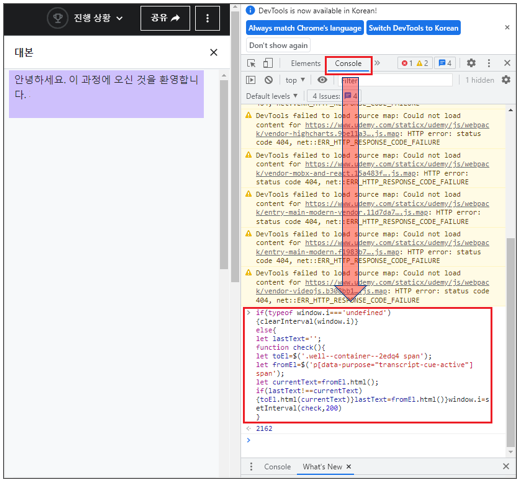
9. F12 Key로 개발자 모드로 들어간 다음 아래 코드 입력 후 Enter

if(typeof window.i==='undefined'){clearInterval(window.i)}
else{
let lastText='';
function check(){
let toEl=$('.well--container--2edq4 span');
let fromEl=$('p[data-purpose="transcript-cue-active"] span');
let currentText=fromEl.html();
if(lastText!==currentText){toEl.html(currentText)}lastText=fromEl.html()}window.i=setInterval(check,200)
}

10. Code 입력 후 Enter 친 다음 숫자가 나오면 성공적으로 적용된 것으로 다시 강의로 돌아와도 한국어로 번역되어 플레이됨


* 참고 링크 1 : https://fomaios.tistory.com/entry/Udemy-%EC%8B%A4%EC%8B%9C%EA%B0%84-%ED%95%9C%EA%B8%80-%EC%9E%90%EB%A7%89%EC%9C%BC%EB%A1%9C-%EB%B3%B4%EB%8A%94-%EB%B0%A9%EB%B2%95featChrome


Udemy 실시간 한글 자막으로 보는 방법(feat.Chrome)

안녕하세요 Foma 입니다! 저는 평소에 공부를 할때 Udemy를 자주 이용하는편인데요. 영어를 잘하진 못하지만 그냥 꾸역꾸역 영어로 들으면서 강의를 들을때가 많았습니다. 그래서 거의 코드를 보

fomaios.tistory.com

* 참고 링크 2 : https://liberspiritus.tistory.com/14


Udemy 실시간 한글 자막으로 보는 방법(feat.Chrome)

fomaios.tistory.com/entry/Udemy-%EC%8B%A4%EC%8B%9C%EA%B0%84-%ED%95%9C%EA%B8%80-%EC%9E%90%EB%A7%89%EC%9C%BC%EB%A1%9C-%EB%B3%B4%EB%8A%94-%EB%B0%A9%EB%B2%95featChrome Udemy 실시간 한글 자막으로 보는 방..

liberspiritus.tistory.com


============================================================================

https://chrome.google.com/webstore/detail/yakuu-automatic-subtitle/mfjgefhkaljdlpmnnfcaebgmchfhakcf?utm_source=chrome-ntp-icon 


Yakuu - Automatic Subtitle Translator

To help Udemy subtitle translation work properly. Also, automatically switch YouTube subtitles to the corresponding language.

chrome.google.com


2022.01.20 (목) 기준으로 크롬에서 한글로 번역 되었다가 말았다가 하네요.

edge로는 번역된게 적용이 잘되고 있습니다. 

크롬이 안되신다면 edge로 강의 들으시길 바랍니다.

반응형
2022-01-19 07:23:19
반응형

MyBatis(마이바티스)란?

MyBatis (마이바티스)는  XML 설명자 또는 주석 을 사용하여 저장 프로시저 또는 SQL 문과 개체를 연결 하는 Java 지속성 프레임워크


 MyBatis(마이바티스) 특징 1


  • MyBatis는 SQL을 별도의 파일로 분리해서 관리
  • 객체-SQL 사이의 파라미터 Mapping 작업을 자동으로 해줌
  • MyBatis는 개발자가 익숙한 SQL을 그대로 이용하면서 JDBC 코드 작성의 불편함도 제거
  • 도메인 객체나 VO 객체를 중심으로 개발이 가능하다는 장점이 있음

* Domain Object (도메인 객체) - 개발하고자 하는 영역을 분석하고, 그 분석의 결과로 도출된 객체들을 의미

* Value Object (VO 객체) - DTO의 읽기 버전 (VO는 출력 : Read Only)

MyBatis(마이바티스) 특징 2


1. 쉬운 접근성과 코드의 간결함

  • 가장 간단한 퍼시턴스 프레임워크
  • XML 형태로 서술된 JDBC 코드라고 생각해도 될 만큼 JDBC의 모든 기능을 MyBatis가 대부분 제공
  • 복잡한 JDBC코드를 걷어내며 깔끔한 소스코드를 유지할 수 있음
  • 수동적인 파라미터 설정과 쿼리 결과에 대한 맵핑 구문을 제거할 수 있음

2. SQL문과 프로그래밍 코드의 분리

  • SQL에 변경에 있을 때마다 자바 코드를 수정하거나 컴파일하지 않아도 된다.

3.  다양한 프로그래밍 언어로 구현가능

  • Java, C#, .NET, Ruby


MyBatis와 MyBatis-Spring을 사용한 DB Access Architecture


  • 개발자가 지정한 SQL, 저장 프로시저 그리고 몇 가지 고급 매핑을 지원하는 SQL Mapper
  • JDBC로 처리하는 상당 부분의 코드와 파라미터 설정 및 결과 매핑을 대신해준다.
  • 기존에 JDBC를 사용할 때는 DB와 관련된 여러 복잡한 설정(Connection)들을 다루어야 했지만 SQL Mapper는 자바 객체를 실제 SQL문에 연결함으로써, 빠른 개발과 편리한 테스트 환경을 제공한다.
  • 데이터베이스 record에 원시 타입과 Map 인터페이스 그리고 자바 POJO를 설정해서 매핑하기 위해 xml과 Annotation을 사용할 수 있다.

장점
- SQL에 대한 모든 컨트롤을 하고자 할때 매우 적합하다.
- SQL쿼리들이 매우 잘 최적화되어 있을 때에 유용하다.

단점
- 애플리케이션과 데이터베이스 간의 설계에 대한 모든 조작을 하고자 할 때는 적합하지 않다.
- 애플리케이션과 데이터베이스 간에 서로 잘 구조화되도록 많은 설정이 바뀌어야 하기 때문이다.

 MyBatis를 사용하는 Data Access Layer

  • MyBatis는 Data Access Layer에서 사용하는 framework
  • Controller에서 Service 호출
  • Service가 DAO 계층에 있는 method를 호출하면 DAO에서 MyBatis를 호출


 MyBatis의 주요 컴포넌트


SqlSession Factory Builder가 Config File을 읽고 Factory를 생성해준다. 개발자가 DB에 insert하거나 Read하는 메서드를 호출하면 SqlSession Factory가 SqlSession를 생성하고 개발자가 작성한 Application코드에 반환해준다.

SqlSession은 개발자가 작성한 SQL문을 호출해주는 기능을 해준다고 생각하면된다.

(1) Appication에서 SqlSession Factory Builder라고 하는 interface 호출

(2) SqlSession Factory Builder가 MyBatis Config File 정보를 읽음

(3) SqlSession Factory Builder가 SqlSession Factory 생성

(4) 개발자가 Appication에 있는 DB Access하는 READ하거나 INSERT하는 Method를 호출

(5) SqlSession Factory를 Appication 상에서 호출

(6) SqlSession Factory가 SqlSession이라는 컴포넌트 생성

(7) SqlSession을 개발자가 작성하는 Appication Code에 retrun(반환) 해줌

- return 받아서 SqlSession에 있는 Method 호출

(8) SqlSession은 핵심 기능으로 볼 수 있으며 개발자가 작성한 SQL문(Mapping File)을 호출해줌


 MyBatis의 주요 컴포넌트의 역할

 출처


+ 강의 교재

반응형

'AI Bootcamp > MyBatis' 카테고리의 다른 글

[MyBatis] MyBatis 설치  (0) 2022.01.18