전체 글 (306)
2022-01-02 22:29:34
반응형

6077. 정수(1 ~ 100) 1개를 입력받아 1부터 그 수까지 짝수의 합을 구해보자.

예시
#다음 코드는 홀 수만 더해 출력한다.
n = int(input())
s = 0
for i in range(1, n+1) :
  if i%2==1 :
    s += i

print(s)

참고
while 이나 for 반복실행구조를 이용할 수 있다.
다른 방법이나 while 반복실행구조를 이용해서도 성공시켜 보자.

n = int(input())
s = 0

for i in range( 1, n + 1 ):
  if i % 2 == 0:
    s += i

print(s)


6078. 영문 소문자 'q'가 입력될 때까지 입력한 문자를 계속 출력하는 프로그램을 작성해보자.

while True:
  a = input()
  print(a)

  if a == 'q':
    break


6079. 1, 2, 3 ... 을 계속 더해 나갈 때,
그 합이 입력한 정수(0 ~ 1000)보다 같거나 작을 때까지만
계속 더하는 프로그램을 작성해보자.

즉, 1부터 n까지 정수를 계속 더해 나간다고 할 때,
어디까지 더해야 입력한 수보다 같거나 커지는 지를 알아보고자하는 문제이다.

end_point = int(input())

total = 0 

for i in range(1, end_point+1):
  total += i
  if total >= end_point: 
    break
print(i)


6080. 1부터 n까지, 1부터 m까지 숫자가 적힌 서로 다른 주사위 2개를 던졌을 때,
나올 수 있는 모든 경우를 출력해보자.

예시
...
for i in range(1, n+1) :
  for j in range(1, m+1) :
    print(i, j)
...

참고
위 코드는
바깥쪽의 i 값이 1부터 n까지 순서대로 바뀌는 각각의 동안에
안쪽의 j 값이 다시 1부터 m까지 변하며 출력되는 코드이다.

조건선택 실행구조 안에 다른 조건선택 실행구조를 넣어 처리할 수 있는 것과 마찬가지로
반복 실행구조 안에 다른 반복 실행구조를 넣어 처리할 수 있다.

원하는 형태로 실행 구조를 결합하거나 중첩시킬 수 있다.

a, b = map(int, input().split())

for a in range(1, a+1):
  for b in range(1, b+1):
    print(a, b)
반응형
2022-01-01 20:58:10
반응형

Step 1. README 생성

https://docs.github.com/en/account-and-profile/setting-up-and-managing-your-github-profile/customizing-your-profile/managing-your-profile-readme


Managing your profile README - GitHub Docs

About your profile README You can share information about yourself with the community on GitHub.com by creating a profile README. GitHub shows your profile README at the top of your profile page. You decide what information to include in your profile READM

docs.github.com

Step 2. yaml file 생성

YOUR_GITHUB_USERNAME --> .github --> workflows --> FILE_NAME.yml

# 커밋 먹는 뱀 그래프 생성을 위한 GitHub Action🐍

name: Generate Snake

# Action이 언제 구동될지 결정

on:
  schedule:
    # 6시간마다 한 번(수정 가능)
    - cron: "0 */6 * * *"

  # 자동으로 Action이 실행되도록 함
  workflow_dispatch:

jobs:
  build:
    runs-on: ubuntu-latest
    steps:
      - uses: actions/checkout@v2

      # 뱀 생성
      - uses: Platane/snk@master
        id: snake-gif
        with:
          github_user_name: [Github 아이디]
          # output branch에 gif, svg를 각각 생성
          gif_out_path: dist/github-contribution-grid-snake.gif
          svg_out_path: dist/github-contribution-grid-snake.svg

      - run: git status

      # 변경사항 push
      - name: Push changes
        uses: ad-m/github-push-action@master
        with:
          github_token: $
          branch: master
          force: true

      - uses: crazy-max/ghaction-github-pages@v2.1.3
        with:
          target_branch: output
          build_dir: dist
        env:
          GITHUB_TOKEN: $


Step 3. Github Action 실행

Generate Snake → Run Workflow


Step 4. 프로필에 추가


![snake gif](https://github.com/YOUR_USERNAME/YOUR_USERNAME/blob/output/github-contribution-grid-snake.gif)


* 참고 링크 1 : https://6h15m.github.io/github/readme/2021/07/20/github-snake.html

* 참고 링크 2 : https://dev.to/mishmanners/how-to-enable-github-actions-on-your-profile-readme-for-a-contribution-graph-4l66?fbclid=iwar2bgcj9b_0owzs_zr5e45y1nbir-9768lyzt1y5a7e4rd4dwwrtauuliss 


====================================================================


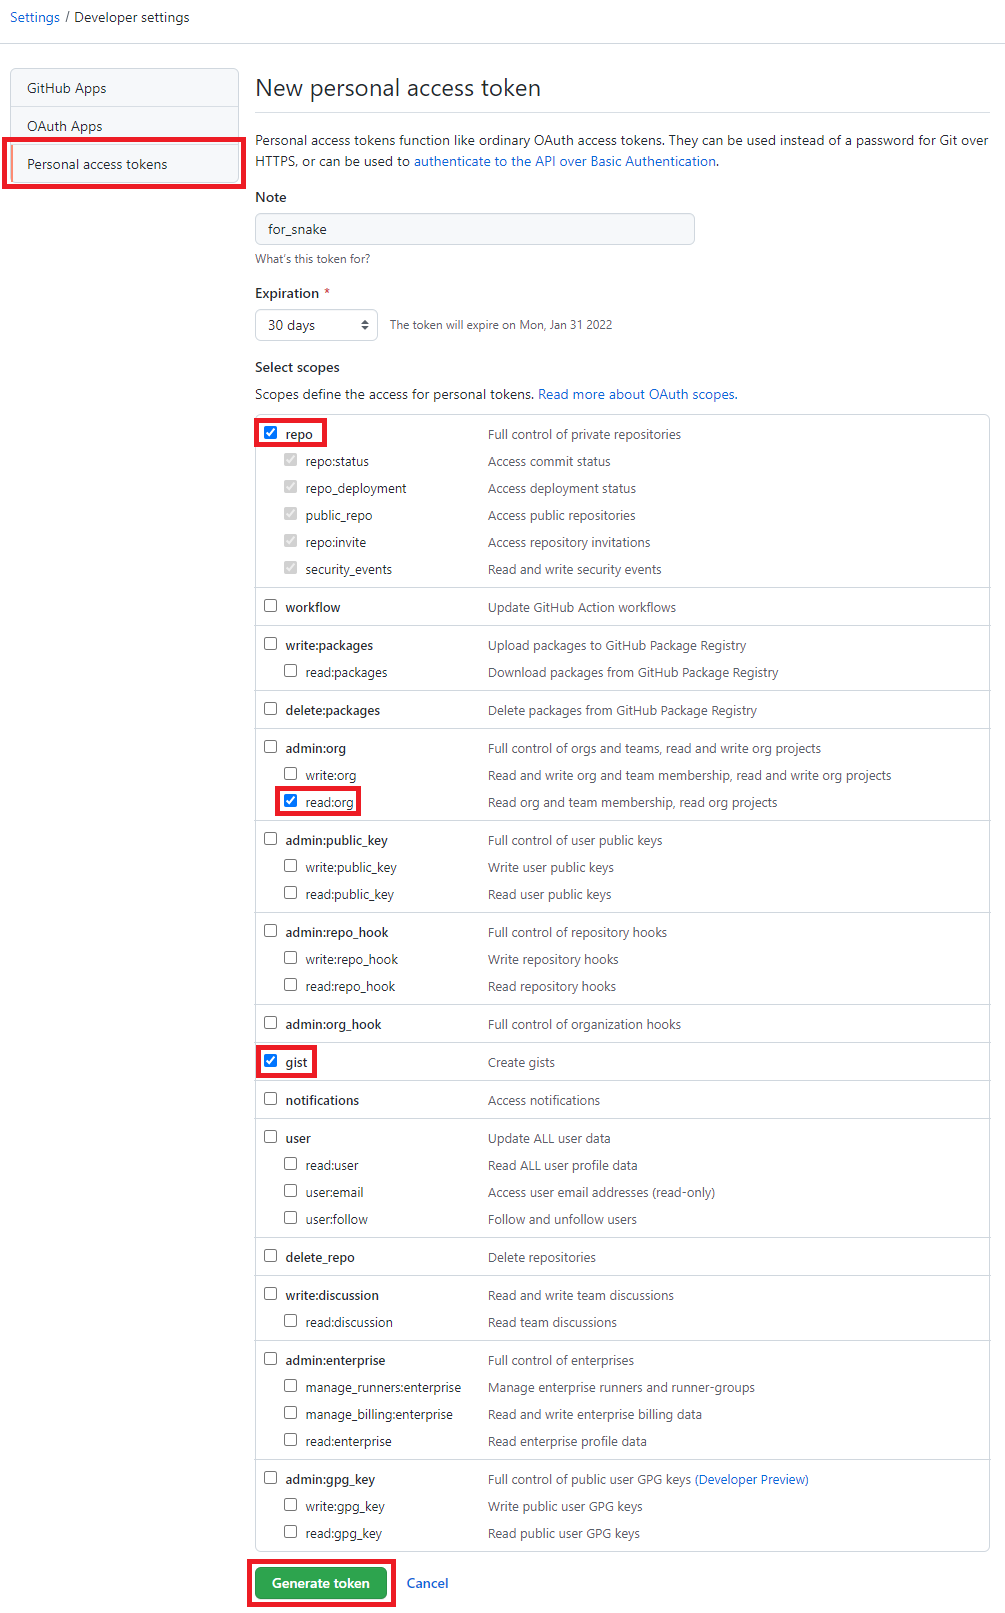
개인 액세스 토큰 사용하라고 에러 뜨는데 아직 해결 못하고 있네요 ㅠ

구글링해봐도 이해가 안되네요. 


반응형
2021-12-30 19:02:43
반응형


Jsoup 설정

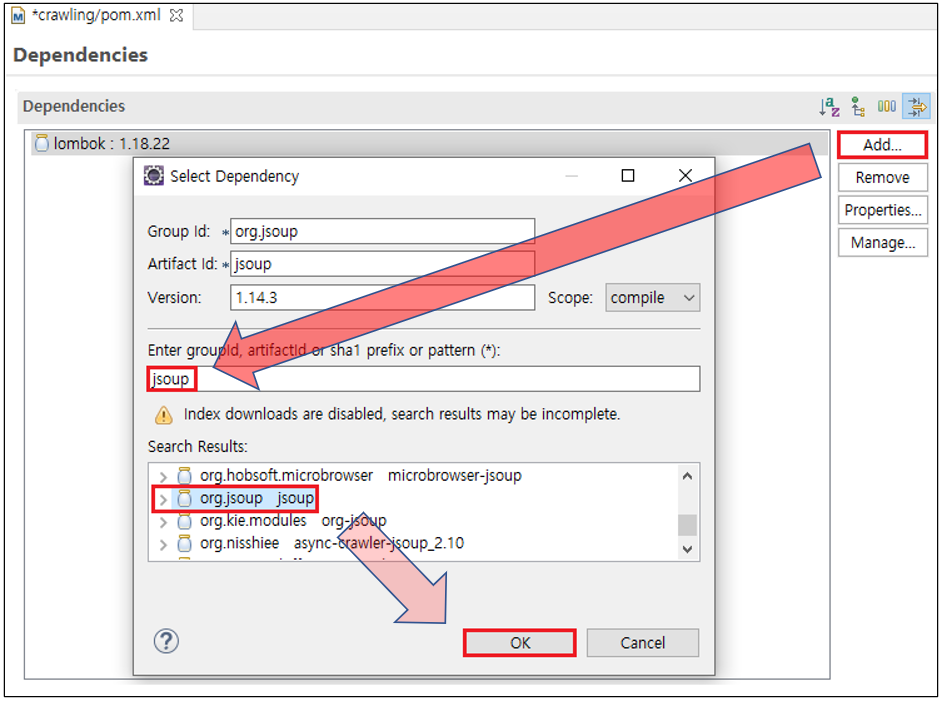
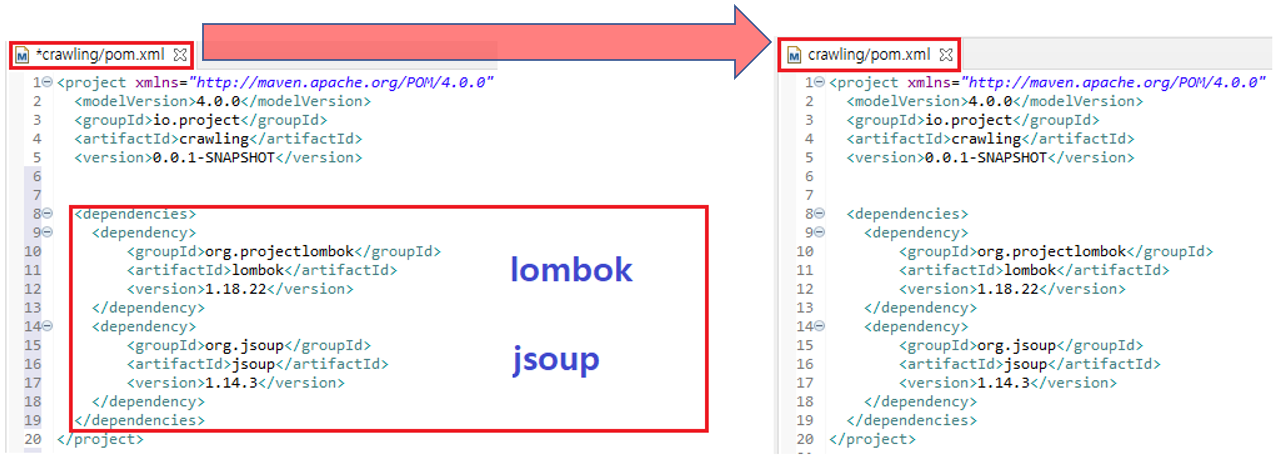
1. Maven Project를 생성 → pom.xml 파일 실행 → 하단에 pom.xml 탭 → Dependencies 탭 마우스로 클릭

2. 


4. 


Jsoup를 활용한 웹 크롤링


반응형
2021-12-30 18:38:40
반응형

Maven Project 생성하기


1. Eclipse 실행 후 Project Explorer에서 마우스 우클릭 → New → Other... 선택


2. [Select a wizard] Wizards 검색창에 maven 입력 → Maven Project 선택 후 Next >


3. [New Maven project] 

□ Create a simple project(skip archetype selection) 체크 

□ Use default Workspace location 체크 

※ Location 경로가 비어있어야 정상적으로 동작

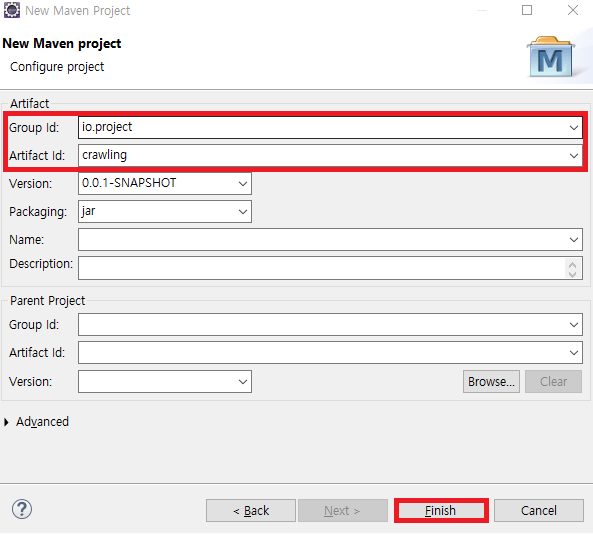
4. [Configure project] Group Id & Artifact Id 입력 후 finish 버튼 마우스로 클릭

- Group Id : 프로젝트 구조

* Group Id는 주소를 반대로 입력

ex) naver.com -> com.naver

- Artifact Id : Maven 프로젝트 명

5. Maven Project 생성 확인


반응형
2021-12-29 23:33:55
반응형
# Download the helper library from https://www.twilio.com/docs/python/install
import os
from twilio.rest import Client


# Find your Account SID and Auth Token at twilio.com/console
# and set the environment variables. See http://twil.io/secure
account_sid = os.environ['TWILIO_ACCOUNT_SID']
auth_token = os.environ['TWILIO_AUTH_TOKEN']
client = Client(account_sid, auth_token)

message = client.messages \
                .create(
                     body="Join Earth's mightiest heroes. Like Kevin Bacon.",
                     from_='+12542796380',
                     to='+821012341234'
                 )

print(message.sid)

https://www.youtube.com/watch?v=M6kQTpIqpLs 

https://www.twilio.com/docs/sms/quickstart/python

반응형

'Python > 코딩 1시간만에 배우기_파이썬' 카테고리의 다른 글

11. 패키지 & 모듈  (0) 2021.12.29
10. 상속  (0) 2021.12.29
9. 클래스  (0) 2021.12.29
8. 복습 - 과일 숫자 세는 프로그램 만들기  (0) 2021.12.29
5. 자료구조 - list(리스트)  (0) 2021.12.29
2021-12-29 23:17:59
반응형
# 패키지 & 모듈

# 패키지 == 라이브러리
# 패키지 = 모듈 1 + 모듈 2 = 패키지는 모듈들의 합

# 모듈 == 코드가 들어있는 파일
# 이 코드가 모여서 어떠한 기능을 구현함

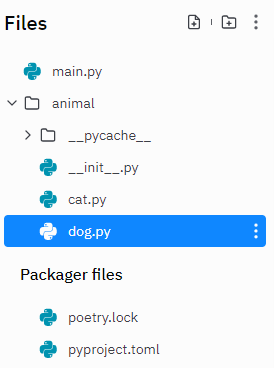
# animal package
# dog, cat modules
# dog, cat modules can sat "hi"

from animal import dog  # animal 패키지에서 dog 라는 모듈을 갖고와줘 
from animal import cat  # animal 패키지에서 cat 라는 모듈을 갖고와줘 

from animal import *    # animal 패키지가 갖고있는 모든 모듈을 다 불러와

# d = dog.Dog() # instance
# d.hi()

# c = cat.Cat()
# c.hi()

d = Dog() # instance
c = Cat()

d.hi()
c.hi()

print("=======================================")


from geopy.geocoders import Nominatim
geolocator = Nominatim(user_agent = "woonie")
# location = geolocator.geocode("175 5th Avenue NYC")
location = geolocator.geocode("Seoul, South Korea")
print(location)
print(location.address)
print(location.raw)
# animal\__init__.py

from .cat import Cat # . <= "이 폴더에 있는" cat.py 이라는 파일에서 Cat 이라는 클래스를 갖고와줘
from .dog import Dog # . <= "이 폴더에 있는" dog.py 이라는 파일에서 Dog 이라는 클래스를 갖고와줘
# animal\cat.py

class Cat:
  def hi(self):
    print("meow!!") # 고양이가 안녕하는 소리
# animal\dog.py

class Dog:
  def hi(self):
    print("bark!!") # 개가 안녕하는 소리

반응형

'Python > 코딩 1시간만에 배우기_파이썬' 카테고리의 다른 글

12. 핸드폰으로 문자보내기  (0) 2021.12.29
10. 상속  (0) 2021.12.29
9. 클래스  (0) 2021.12.29
8. 복습 - 과일 숫자 세는 프로그램 만들기  (0) 2021.12.29
5. 자료구조 - list(리스트)  (0) 2021.12.29